If you’re used to print design, you’re probably familiar with DPI (dots per inch)—a key metric for determining image quality. But in Figma, a tool primarily designed for screen-based design, DPI works a bit differently. In fact, Figma doesn’t offer a direct DPI setting, but there are smart ways to achieve the high-resolution output you need for different use cases.
📐 What Is DPI?
DPI stands for “dots per inch” and refers to the number of printed dots per inch of digital output. For print, 300 DPI is the standard for high-quality resolution, while screen designs typically use 72 DPI.
But here’s the catch:
👉 Figma works in pixels, not inches or DPI.
This means when you design something in Figma, you’re specifying its dimensions in pixels (px), which translates differently depending on how it’s exported or printed.
🛠️ How to Export High-Resolution Assets (Simulated DPI)
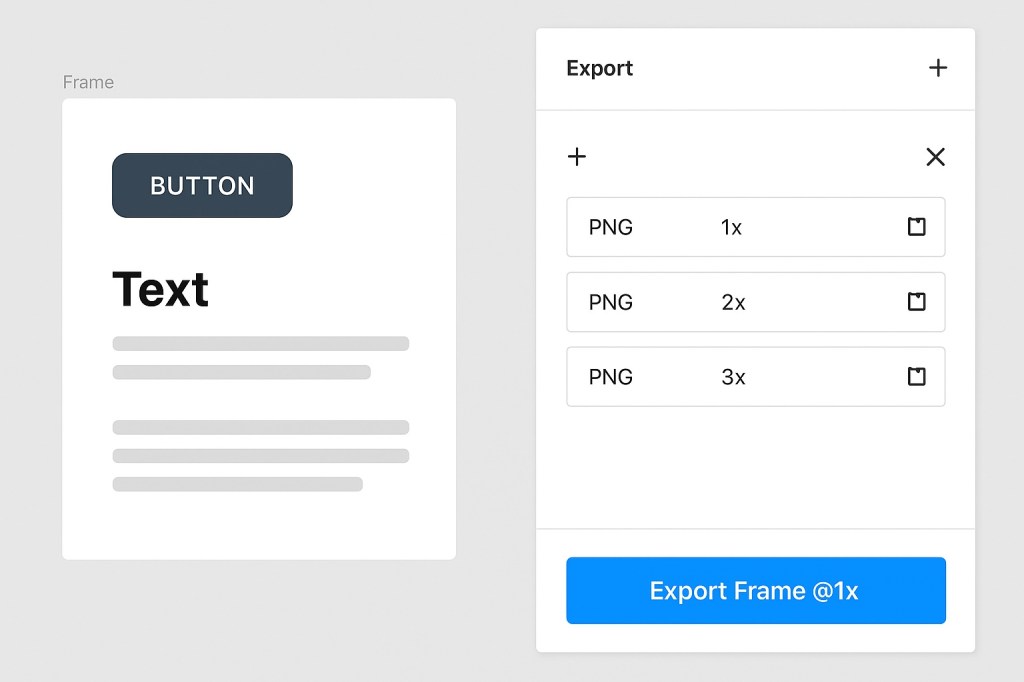
Although you can’t change DPI directly in Figma, you can simulate it by exporting at a higher scale. Here’s how:
✅ Option 1: Export at 2x or 3x
- Select the object, frame, or artboard you want to export.
- In the right-hand panel, click “+” under the Export section.
- Choose
PNG,JPG, orSVG. - Select 2x, 3x, or a custom scale (e.g. 4x) to increase resolution.
- Click Export.
The higher the multiplier, the more pixels in the final file—effectively increasing the quality for printing or retina displays.
✅ Option 2: Export as PDF for Print
- Figma allows you to export vector-based designs as PDFs, which scale beautifully for print.
- Open the frame or file.
- Go to File > Export or select the frame directly.
- Choose PDF as the format.
Then, use software like Adobe Acrobat or Photoshop to assign a specific DPI when prepping the file for print.
✍️ Pro Tip: Calculating DPI Outside of Figma
You can determine the effective DPI after exporting by using this formula:
ini DPI = (Pixels / Inches)
For example:
- A 3000px wide image printed at 10 inches will be 300 DPI.
- You can control this by adjusting either the export resolution or scaling the asset in print layout software.
⚠️ Things to Keep in Mind
- DPI is only meaningful when printing. For digital products (websites, apps), pixel size matters more.
- Exporting at
3xor4xresults in larger files, so only use higher scales when needed. - Some print services may allow you to set DPI in their platform when you upload your exported file.
✅ Wrapping Up
Figma doesn’t use DPI in the traditional sense, but that doesn’t mean you can’t prepare high-resolution assets for print or retina screens. By exporting at higher scales or using PDFs, you can simulate the effect of higher DPI and ensure your designs look crisp everywhere they appear. The key is understanding how pixel size translates into print dimensions and using the right tools in your workflow.

