A stripe pattern is a simple yet stylish way to add visual interest to your design. Whether you’re creating a subtle texture, a background fill, or a branding accent, Figma gives you everything you need to make stripe patterns quickly — no plugins required.
In this tutorial, you’ll learn two ways to make stripe patterns in Figma: manually using vector shapes, and using tiling tricks for reusable backgrounds.
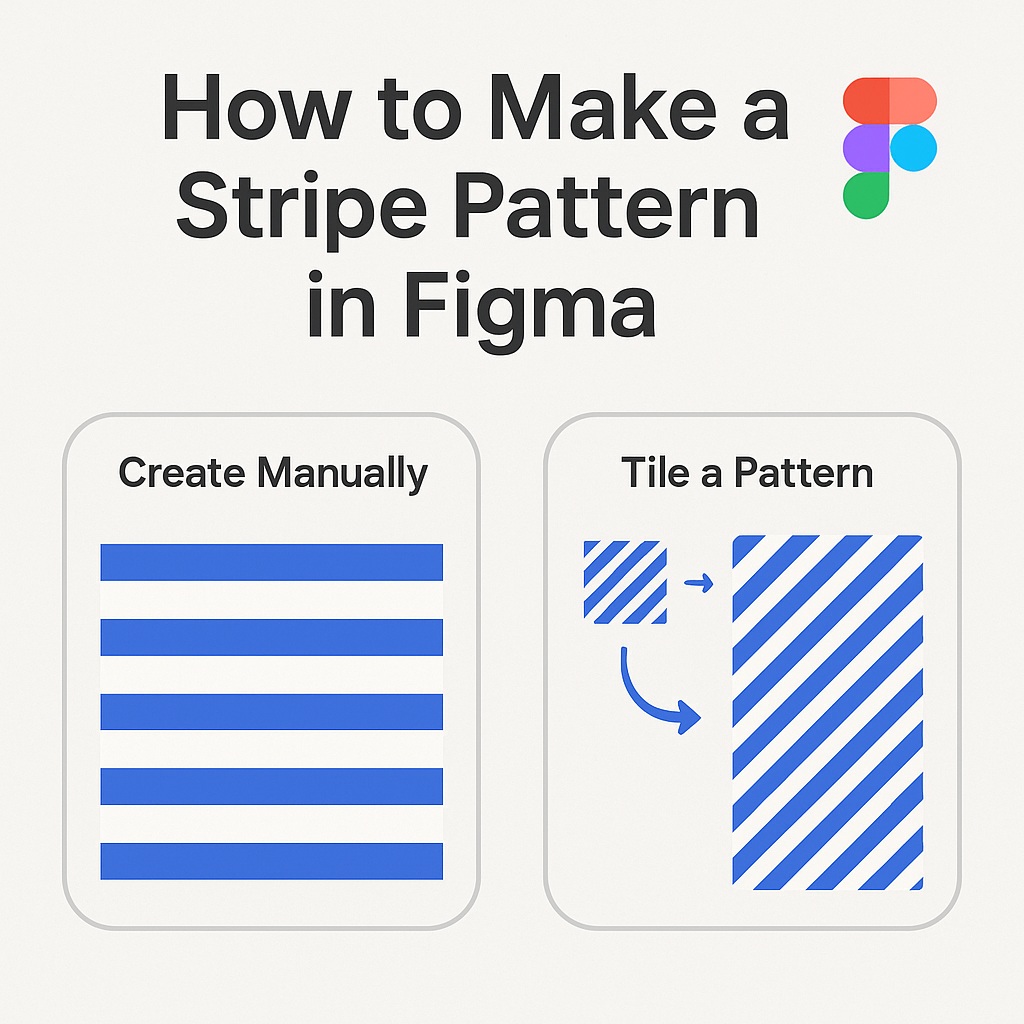
🎯 Method 1: Create Stripes Manually with Rectangles
This method is great for creating a custom pattern or filling a small area.
✅ Steps:
- Create a Frame or Shape
Start with a frame or shape where you want the stripe pattern. - Draw the First Stripe
Use the Rectangle Tool (R) to draw a narrow stripe — for example, 4px wide and 40px tall. Set the fill color. - Duplicate the Stripe
PressCmd/Ctrl + Dto duplicate the stripe. Move it to the side, spacing it out evenly (e.g., 8px apart). - Use Smart Duplicate
Select both rectangles, pressCmd/Ctrl + Dagain. Figma will repeat your duplication and spacing automatically. Keep duplicating until you fill the desired area. - Group or Flatten
You can group the stripes or useFlatten(Cmd/Ctrl + E) if you want to treat them as a single shape.
🎨 Optional: Rotate the pattern for diagonal stripes.
🌀 Method 2: Make a Tiling Stripe Pattern
This approach creates a seamless, reusable stripe tile that you can use as a background fill.
✅ Steps:
- Make a Small Frame (Tile)
Create a small frame (e.g., 40x40px). - Draw Diagonal Stripe
Use the Line Tool (L) or Pen Tool (P) to draw a diagonal line across the frame (45° angle works great). Adjust thickness and stroke color. - Duplicate and Align
Copy the line, align duplicates at regular intervals to form a repeating pattern. - Group and Export as PNG
Select all lines, group them, and export the frame as a PNG with transparent background. - Use as Fill
In your main design, select a shape, go to Fill > Image, and import the exported stripe tile. Set it to “Tile” mode for repeating.
🧠 Pro Tip: You can use Component Instances instead of image exports to keep everything editable inside Figma.
🔧 Customize Your Stripes
| Option | Result |
|---|---|
| Color | Use brand colors or muted tones |
| Width | Thin = subtle, Thick = bold |
| Angle | Horizontal, vertical, or diagonal |
| Opacity | Add transparency for overlay textures |
🚀 Bonus: Use Blend Modes for Styling
To create a more elegant effect:
- Place the stripe pattern over an image or color block.
- Select the pattern layer and change the Blend Mode to
Multiply,Overlay, orSoft Light.
This gives your pattern a nice integrated look with background content.
📌 Wrap-Up
Creating a stripe pattern in Figma is surprisingly easy. Whether you’re going for retro vibes, clean UI backgrounds, or visual texture, you can build and reuse stripes without relying on plugins or external assets.
Want more design tricks like this? Browse our Figma tutorials at Designilo.com — all focused on productivity, styling, and design systems.

