Creating a swipe effect in Figma allows designers to simulate mobile gestures like sliding between screens or panels. This is especially useful for prototyping apps with carousels, onboarding flows, or tabbed navigation. While Figma doesn’t natively support touch gestures like in mobile app development, it provides a powerful prototyping feature that lets you mimic swipe interactions using smart transitions.
Step-by-Step: Creating a Swipe Effect in Figma
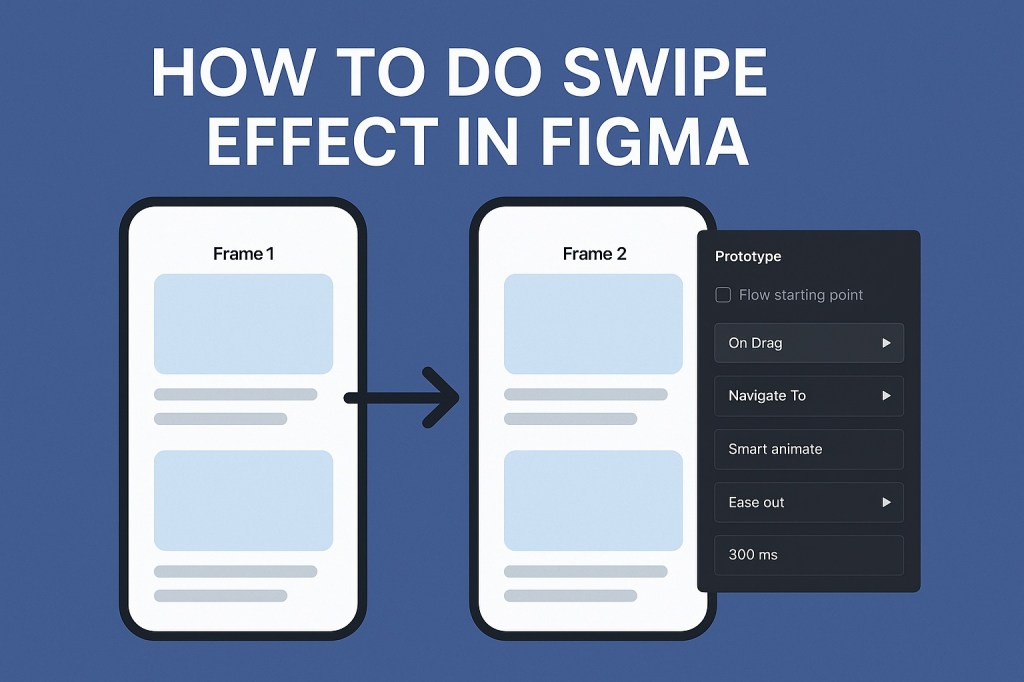
1. Set Up Your Artboards (Frames)
Start by creating two or more frames that represent different “screens” or panels of your swipe interaction.
- Use the Frame tool (F) to draw each screen.
- Place them side by side horizontally to visualize the flow of swiping left/right.
- Populate each frame with the content you want to show (e.g., cards, images, UI elements).
2. Group Swipeable Content
If you’re designing a carousel, make sure each item (like a card or slide) is grouped neatly. This helps when applying animations.
- Select the elements you want to swipe.
- Use Cmd/Ctrl + G to group them.
- Optionally, apply Auto Layout if you’re working with repeating components.
3. Add a Prototyping Trigger
Switch to Prototype mode and link one frame to the next.
- Click the blue node on the right edge of your first frame.
- Drag it to the second frame.
- In the Interaction Details panel, set:
- Interaction: On Drag
- Navigation: Navigate to [Next Frame]
- Animation: Smart Animate
- Easing: Ease Out (or Spring for bounce effect)
- Duration: Around 300ms for a natural swipe feel
Tip: Use On Drag as the trigger to simulate a swipe gesture.
4. Add the Reverse Swipe
Repeat the process in the opposite direction:
- Link the second frame back to the first.
- Use On Drag, Smart Animate, and a matching duration.
5. Preview the Prototype
Click the Present button (▶️) to test the swipe effect.
- Try dragging the screen to the left/right.
- You’ll see the panels slide as if swiping in a real app.
Pro Tips
- Use overlapping elements (like shadows or transition elements) to create smoother visual continuity.
- Smart Animate works best when objects between frames have the same layer names and structure.
- If you want vertical swipes, just place your frames stacked vertically and use drag-up/down interactions.
When to Use Swipe Effects
Swipe effects are ideal for:
- Image carousels
- Onboarding screens
- Newsfeed or content tabs
- Custom sliders in app UI mockups
Limitations
Figma prototypes simulate interactions visually, but they don’t support real touch gestures like velocity-based swipes or swipe-to-dismiss unless manually animated. For advanced gestures, tools like ProtoPie or Framer may be more suitable.
In summary, creating swipe effects in Figma is simple with Smart Animate and “On Drag” triggers. It helps bring your mobile UI designs to life and communicates interactions clearly in your prototypes.

